Saturday, September 29

Apple Cider Designer Paper


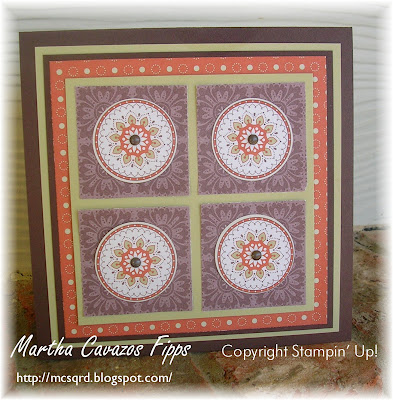
It's a beautiful September day in North Texas. My stamping time has been very limited the last week or so but yesterday afternoon I actually had about an hour to play while Micaela took her nap. I didn't exactly stamp, just played around with the Apple Cider Designer Paper, trying to come up with a quilt design. In the end, my card didn't quite turn out quilt-like but I had fun piecing the papers together anyway. I just love this paper!


This card is 5 1/4 inches square, perfect for our Medium Square envelopes. I started with Chocolate Chip 12x12 card stock for the base. The other layers are River Rock and Apple Cider DP. The circles were punched out with the 1 3/8 circle punch and the Close to Cocoa designer paper (also Apple Cider) under was cut at an angle to get the design to hug the circle. The rest is easy to to figure out but please email me if you have any questions.

RAK from Michele


My friend (and sideline) Michele gave me this card as a thank you for letting her borrow my Bronco Buster Stamp Set. I love how she used twine for the lasso! This is a perfect TEXAS card, thank you Michele!
.
ETA: This is CASED from Debbie Olson her blog is Thinking Inking, here is the link

My family is growing!

My family is growing! Well, my Stampin' Up! family that is. I know some of you were thinking I might be expecting.... Anyway, I have a new recruit! I am so excited. Mandi Brooks has joined my Stampin' Up! family! I have known Mandi for about 10 years. She lives in the Bonham area, were I lived from 1997-2002. Mandi started coming to my classes and workshops almost a year ago. She was hooked on stamping immediately. She is going to introduce Stampin' Up! to lots of wonderful people in Fannin County, it's going to be great. Mandi joins my other recruits, Tina and Shelly. The best thing about all of this, is now I am a Senior Supervisor! Yahoo!

Welcome Aboard Mandi!

Little Girl Birthday Card

Micaela had a birthday party to attend for her little friend Lauren. Lauren is turning 3! As I started to make a card, I realized that I don't have any current stamp sets geared toward little girls. All I have for birthdays seems to be cakes & candles. Although this stamp set was perfect, I think it's been retired for a long long time. (I bought it from a demonstrator that had been retired for a while, shortly after Micaela was born).


Nonetheless, here's the card. I thought it turned out cute. The birthday party was at Build A Bear and ironically Micaela built a dog & Lauren the birthday girl a cat but Micaela is the brunette and Lauren is the blonde so I got the hair color wrong.


All materials SU. Used Green Galore for the card base. Stamped the dots in Basic Black using the new PolkaDot background stamp. The 3 is from the retired Whimsical Numbers. The "happy birthday wishes" sentiment is from Fun & Fast Notes, I mounted all the words on the side of the wood block. The images are colored in using our Many Marvelous Markers, stamped on Whisper White and matted in Pixie Pink, Green Galore and Basic Black. Sorry for the shading in the picture, we were on our way out the door to the party when I realized that I needed to take a picture.... so I quickly propped the card on our dining room table and took the picture. The sunlight from the blinds created those shadows.

Thursday, September 27

Quick Apple Crisp

I've been meaning to share this recipe all month. This is one of my favorite apple recipes. I've been thinking about it since Holiday Mini Collection catalog came out with the Apple Cider Designer Paper pictured here. I love making this recipe using my KitchenAid Food Processor to slice all the apples! I can literally slice a dozen apples in less than 3 minutes. The original recipe is from Pampered Chef, I got it when I hosted my first cooking show back in 1995. I have modified it over the years. I hope you enjoy it!


Quick Apple Crisp

Ingredients:
5 Granny Smith apples
(I have used all kinds of apples, Red Delicious and Gala. Use more if you would like your servings to be taller)
1 package (9 ounces) yellow cake mix (basically a half of a box)
2 tablespoons sugar
1 tablespoon ground cinnamon
1/4 cup butter or margarine, melted
1/2 cup chopped nuts (I use more like a full cup and typically I use pecans)

Directions:
Preheat oven to 350°F. Peel, core and slice apples. (I use my food processor to do the slicing). Place apples in Deep Dish Baker. If you really like pecans, sprinkle them throughout the apples.

Combine cake mix, sugar, cinnamon, butter and nuts in a bowl. Mix until crumbly. Sprinkle mixture evenly over apples.

Bake 35-40 minutes or until apples are tender. Serve warm with ice cream or whipped topping, if desired.
MOMS Group

I just started attending a Moms Group at a friends local church. It's a chance for Micaela and I to get out and meet some new people. She gets to play with children her age and I get some social and spiritual time with other Moms. We meet twice a month, enjoy a delicious brunch, listen to speaker and socialize. I am a newbie, this was my third meeting.

Today we had a fabulous meeeting. The topic was "The Five Friends Every Mom Needs". It really made me reflect on the friendships I have. I really have so much to be thankful for in the "friends department". After the presention, we played a "game"... called "Fast Friends" -kinda like the concept of speed dating/musical chairs. It was so much fun. Can you imagine more than 50 women moving from seat to seat, getting to know each other really quick. The room was roaring but it was so fun. At each chair you had a quick question to ask your partner after you got the basics... name, kids & ages, etc.
.
One of my favorite questions during the process was "Tell me about the favorite picture in your house." I didn't even have to think about it. We have alot of photographs in our house-- many on the wall going up our stairs. In the landing we have a big collage of our favorite and most special black & white photographs. The collage includes pictures of our wedding and our daughter. In the center of the collage is a 16x20 enlargement of our wedding ceremony.
.
Here it is. I love how you can see the majority of the guests and even the priest's dog laying on the floor to my left (more on the priest & his dogs in another post)


To the right of the big wedding photo is a group of photos of Micaela. The largest one in the group was taken when she was one year old. It took us a long time to teach her to point her little finger to say she was one-- we were thrilled when the photographer actually captured this moment.


Also in the grouping is this photo when she was less than one day old. She was snuggled beside me in the hospital bed looking so content after one of her first feedings . We used this picture for her birth announcement.


We love all the photos on our wall. I won't bore you by posting all of them here but I will share this last one. It's in a modest 5x7 frame and it captures the moment Micaela was brought into the world. Sorry if you think this is gory. Troy captured this picture as Micaela took her first breathe (and was screaming at the top of her lungs). I love how the light shines on her. We were fortunate to have a wonderful doctor that allowed Troy to take as many pictures as he wanted. I was so interested in getting pictures that I told him, he did not have to worry about holding my hand during the C-section-- just snap snap snap, (I knew he could hold my hand later and we would not have this moment again).

Thanks for letting me share a few of my favorite pictures with you! I hope this inspires you to display some of your favorite moments too.


Wednesday, September 26

I am back...

I am sorry I have been a bad blogger for the last week. I've had two big freelance assignments that have taken alot of my time. Last week I had the Hasbro Toy assignment and this week another assignment with General Mills.

Thursday, September 20

Game of Life: Twists & Turns Edition

Last week I mentioned there was a new Game of Life from Hasbro Toys coming soon. I am sure you all thought, why in the world is Martha posting this. Well, now I can tell you more.

From time to time I do work for different public relations companies. This latest assignment was "delivering" big huge baskets of goodies and The new Game of Life: Twists & Turns to local radio personalities.

This new edition gives players a chance to choose how they want to live their life by giving them four different path to take throughout the game –

“Love it” = family, “Live it” = adventure, “Earn it” = money/career, “Learn it” = education.

The game is now available at mass retailers.

Wednesday, September 19

Creepy Crawly Gift Box

Paper Mache Box covered in Creepy Crawler Designer Paper. I got the idea from Shelli Gardner at Convention. I used Modge Podge to adhere paper to box. I painted the lid with Black acrylic paint. The band is crimped Pumpkin Pie card stock layered with a strip of black and another one of the designs from the Creepy Crawler assortment. I made the paper bow using the tutorial found on Melissa Stouts "The Stamp Doc's" blog. Not sure exactly what I will put in this box, I do know that it will be at least four feet off the ground and out of the reach of our little Micaela.


Troy's Great Wall-- Phase One

My husband is a DIY (do it yourself) kinda guy. He likes to build things. Our backyard slopes and ever since we found this house when it was still under construction, he had the vision to build a retaining wall out of stone. Please, fast forward almost 4 years. Now, that the weather is not so hot and he's got some free time during the day, he has started. Phase 1 is getting all the stone. So here is his/our pile of stone. Each of these rocks has had to be hand carried to our back yard-- so that's like more than 100 trips already. The digging is about to start. Stay tuned for more updates on "Troy's Great Wall" in weeks to come.


Tuesday, September 18

Wow, more than 2000 hits!

Wow, more than 2000 hits. That is amazing. Thank you for visiting my blog. Please, please take the time to sign the guest book at the bottom--- I want to know who's visiting!

Tic Tac

Here's a little Tic Tac Halloween treat I made over the weekend. I got the idea from Angie Juda. She has a fabulous gallery on SCS. I followed the tutorial on her blog. Instead of using gingham ribbon and tying a bow, I did a little belly band.
.

I used Basic Black card stock for the base, a crimped strip and scallopped circle in Pumpkin Pie and More Mustard card stocks. The witch shoe came from the Itty Boos Too stamp set. These are quick to make. You just slide the belly band off and open like a book to reveal the Happy Boo to You message and the Tic Tacs inside.
.

Here's what it looks like opened.
.

More Halloween Ideas Coming...

It was an extremely busy weekend. I spent alot of time at the Dillard's Grand Opening in Frisco. I am busy working on Halloween ideas which I will be posting in the coming days. Bad thing about making Halloween treats is that I have all these bags of candy... candy corn, M&M's, Reese's, Hershey's, etc. sitting around my desk. That is dangerous!

Be looking for some cute ideas for packaging, Hershey's nuggets, Gatorade, pencils, and other fun treats in the next few days.

Also, mark your calendars for October 1st. I will be having an event to celebrate World Card Making Day at the Creative Cottage here in McKinney.. More details and samples coming soon!

Friday, September 14

Batty Cracker

My upline Denise Sullivan made this adorable cracker! Isn't it the cutest thing you've ever seen? I let her borrow my "Batty For You" stamp set and this is what she gave me as a thank you!


If you are interested in directions, please post a comment. You can post a comment by clicking on title and then scrolling to the bottom of the screen.

Update:

OK, so I have gotten alot of requests for the pattern. The cracker pattern came from Paper Crafts magazine. If you go to their website, find October patterns and it's the last one, page 8. I tried to find an actual magazine (to see a sample) at two stores today but only found the Aug & Sept issue. I guess the October one is not in the stores, or at least not the stores where I am looking.

A NEW "Game Of LIFE"

Did you know that a new "Game of Life" is being introduced by Hasbro Toys?

Stay tuned for more details next week-- September 20th to be exact!


Psst... Pesto anyone?

One of the perks of being a KitchenAid product specialist is getting the opportunity to try new recipes as I demonstrate the appliances. Everyone knows the KichenAid Mixer is fabulous but not many know about all the different attachmentments that are available.


.
Pesto is usually made in a food processor, but you can also use the food grinder attachment for your mixer.
.

This recipe is pretty easy and delicious. The best thing is that it does not call for pine nuts which can be a concern to folks with alergies. I got wonderful reviews when I demonstrated and served this at Bed, Bath & Beyond, Williams Sonoma and Dillards. Everyone loved it!

Pesto
2 cups fresh basil leaves
1 cup parsley sprigs
8 cloves garlic
1 teaspoon salt
1/2 teaspoon pepper
1 cup parmesan cheese
1/2 cup olive oil

Assemble food grinder using fine grinder plate and attach to mixer. Turn to speed 4 and grind basil leaves, parsley springs and garlic into mixer bowl. Add salt, pepper and parmesan cheese. Attach bowl and wire whip. Turn to speed 6 and whip 1 minute. Stop and scrap bowl. Turn to Speed 8 and gradually add olive oil in thin, steady stream whipping until absorbed.

Serve with pasta, or over baked potatoes, or spread over toasted baguette slices.

Tuesday, September 11

Brocade Background Designer Paper.....


Brocade Background Designer Paper is featured on this card. This is another one of the cards from "Pick a Petal and Baroque Motifs" class last week. This is a real unique fold. I will post pictures of the card open along with the recipe later on today.

A Brand New Dillards!


One of my other KitchenAid trade partners is Dillard's Department Store. Although there are more than 10 stores in the Dallas Fort Worth metroplex, they have always been missing at Stonebriar Center in Frisco. Stonebriar is one of the largest malls in Texas and probably the state and southwest. Anyway, after Macy's & Foley's merged, there was finally a space for them. Tomorrow is the grand opening and of course I will be there on behalf of KitchenAid demonstrating our fabulous new blender and all of the KitchenAid line. It's going to be a huge celebration, more than $30,000 in prizes including Rolex watches and a cruise! You can read all about it here. If you come, make your way to the housewares department for some freshly blended strawberry lemonade from me!


It's about time for Pumpkin Bread

This weekend I popped in at one of my favorite KitchenAid trade partners, Sur La Table. I love going to visit them because they have such cool stuff. Their first display as you walk in the door are these great new pumpkin pans by Wilton.


I love cast aluminum bakeware! I have a bunch of different shaped pans. My biggest problem is that they do not nest and they take up alot of space. I ran out of space to store them in my cabinets so I started hanging them on the wall in my laundry room. (You know that thrilled my husband). I just love these new pumpkins, especially the little ones because I love making desserts in individual portions. These little pumpkins are just too adorable. I was thinking they would look cute placed in a rectangle baking pan in a group.... kinda like a 13x9 with some green paper shreds to make like a pumpkin patch. Wouldn't that be too cute! I think I am going to have to buy the pan to show you all!

Monday, September 10

Banana Bread Anyone?

We had some very ripe bananas in our fruit bowl this afternoon. Normally I would just throw them out but since I had the evening free (no stamp club tonight) I decided to bake some Banana Bread. I tried this recipe and it was great. Very simple, not too sweet and quick.


  • 3 or 4 ripe bananas, smashed
  • 1/3 cup melted butter
  • 1 cup sugar (can easily reduce to 3/4 cup)
  • 1 egg, beaten
  • 1 teaspoon vanilla
  • 1 teaspoon baking soda
  • Pinch of salt
  • 1 1/2 cup of flour

Of course I used my KitchenAid mixer to mix all the ingredients. Preheat the oven to 350°F (175°C). Mix butter into the mashed bananas in a large mixing bowl. Mix in the sugar, egg, and vanilla. Sprinkle the baking soda and salt over the mixture and mix in. Add the flour last, mix. Pour mixture into a buttered 4x8 inch loaf pan. Bake for 1 hour. Cool on a rack. Remove from pan and slice to serve. Enjoy!

Micaela & her Pet Rock

If you've been reading here for a while, you know that our daughter Micaela just spent a few days visiting Mimi & Papa (grandparents) in St. Louis. She had a great time and didn't seem to miss us, one bit. During one of her walking adventures with Mimi, she found a rock. Yes, a rock. She's very excited about her rock and rarely has it out of her sight. She will even tuck it into her diaper if she doesn't have a pocket! The rock doesn't have an official name, yet but she sure is proud of it. Here's a picture of her proudly holding "the rock" after the excursion.


Another Baroque Motifs Card


Here's another one of the cards from the last class. We embossed the motif with Gold Embossing Powder. The card base is Creamy Caramel and the layer is Night of Navy. We used some of the retired gold cord on the fold.

Lady Bug from Pick A Petal Stamp Set

Here's the 2nd Pick A Petal card from the "Baroque Motifs & Pick A Petal" Class last week. Here we used the polkadot petal and circle punches to make a lady bug. The flowers were made by layering the big flower from the 5 Petal Flower punch with the little flower from the Spring Bouquet Flower Punch. I got the original idea from Stamp_NScrap on SCS. The birthday sentiment is from the new Hugs & Wishes set, it is embossed with Real Red Craft and clear embossing powder. The card stock colors are Real Red, Summer Sun, Brilliant Blue and Only Orange.

Sunday, September 9

Butterfly from Pick A Petal Stamp Set

Here's another one of the cards from my class this past week. I promised we would use the petals from the Pick A Petal Stamp set to make all kinds of bugs. Here we used the petals to make the wings on the butterfly.

It's hard to tell in this picture, but the petals were stamped in Rose Red Craft Ink and then embossed with Hologram Highlights- so they are real glittery. The body of the butterfly was done with a circle and a petal piece from the On Board Blossoms & Basics, our coordinating chipboard. The chipboard was pressed into a Garden Green Craft Pad and also embossed with Hologram Highlights. The background paper is from the Cutie Pie collection, it's matted in Garden Green and then mounted on a Rose Red card base.

Saturday, September 8

Quilt Card

Now that September is here, fall is just around the corner. Chilly fall days make me want to curl up on the sofa, cover up with a quilt and watch a good movie. So speaking of quilts, this is one of the cards we did in my class this week.


The card is 5.5 inches square. I love square cards! I got the idea for this card from Jana Weaver, an American blogger in Germany. She got the idea from Nancy Riley, her link is below.
Ok, back to the details about the card: I used the new "Le Jardin" Designer Series Paper from the new Fall & Winter collection. I was so excited to use this paper, I actually won it as a doorprize at a swap back in August and I have been "saving" it for something special. Along with the designer paper, I used Bashful Blue, So Saffron, River Rock and Vanila card stocks. Although this looks difficult to do, it is actually quite easy and a great way to use up scraps of paper. The "motif" in the center is from the "Baroque Motifs" stamp set. It was stamped in So Saffron Craft Ink and then embossed with clear embossing powder, cut out, placed on a few dimensionals and finished off with a Bashful Blue brad.


Think of all of the possibilities with this design. You could use pastel patterns for a baby card, jewel tones for a richer look, and seasonal patterns for autumn, Halloween or the holidays.


If you would like directions on how to do this, go to Nancy Riley's blog http://stampinat6213.blogspot.com/2007/07/quilt-card-tutorial.html or send me an email at MCSQRD29@aol.com.


Thanks for looking and have a nice weekend!

She's back!

Micaela is back from visiting her grandparents in St Louis. Within minutes, she was dumping toys out of her toy box and making requests. We're glad to have her home even though she is a little tornado!

Wednesday, September 5

Halloween Class coming soon!

Here is a sample of some of the projects for the Halloween Decor class coming later on this month. I love our new "Creepy" designer paper!


If you think you would like to do this, please start saving your canisters of snack foods (Pringles), peanuts, etc. now. The class will be structured like the Au Chocolate class in the Spring where you purchase a "bundle" of supplies and have the liberty of making the projects you would like. More details to follow in a couple of weeks!

This picture was provided by Karole Harris (aka FlyGirlStamper on SCS) a demonstrator in Normal, Illinois. Thank you Karole!

Tuesday, September 4

Stamp A Stack This Thursday!

Micaela is spending the week with Mimi & Papa (Troy's Parents) so I am going to have a Stamp A Stack all day Thursday, September 6th!
.
We'll be using two of the new popular stamp sets: Baroque Motifs & Pick A Petal
.
Come & See the petals turned into all kinds of cute bugs... a butterfly, bumble bee, lady bug, dragon fly and even a mouse!
.
These will be cards that YOU can pick sentiment... make them birthday, thank you, sympathy or whatever sentiment you want. I will have all my word stamp sets out for you to choose from.
.
Stamp 10 cards & envelopes for $20
.
As always, bring your favorite adhesive and basic cutting tools. Tell me what time of the day works for you... Bring a friend that doesn't receive my emails and you pay only $15! Please reserve your spot and time by Wednesday afternoon so I can have supplies ready for you the next day.

RAK from Carole

Here's a RAK (Random Act of Kindness) I received from Carole, my very first recruit that lives in Evansville Indiana. Isn't that a funny monkey-- he reminds me so much of Curious George!

.
Thank You Carole! It was a nice surprise to receive a fun RAK amongst a bunch of boring mail.


Last Month's Projects

Here are two of the four cards we did during last months Stamp Clubs. I have four groups that meet on a monthly basis; First Monday, Second Tuesday, Third Thursday and a new group starting on the Second Thursday of the month. Please email me if you are interested in finding out more about my stamp clubs.
Now, for the projects:


This first card was done using the new Priceless Stamp Set. The colors are Purely Pomegranate, Whisper White & Black. It's hard to tell in the picture but the heart is hanging with silver cord. The "From the Heart" (Hugs & Wishes stamp set) is embossed using black craft ink and clear embossing powder.


This second card was really out of my comfort zone. I usually don't do much in Earth Elements but since autumn is around the corner, I figured I better start. I started with a card base of Chocolate Chip, stamped the background with the Paisley background stamp in chocolate chip ink for a tone on tone effect. Stamped the medallion from the "Wanted" stamp set in chocolate chip craft ink on Naturals Ivory card stock, embossed with clear embossing powder and used the new Scalloped Circle Punch to punch it out and added the Aged Copper brad in the center. I layered the madallion on Really Rust, Chocolate Chip, and Sage Shadow squares. I used a strip of the new Outlaw Designer Paper and some 1/4 inch chocolate chip grosgrain ribbon in the center. I punched a large oval in the lower right corner to make a window effect for the "Hi There" message inside. Inside I added a piece of Close to Cocoa since it would be difficult to write on chocolate chip card stock. More samples coming tomorrow!

Monday, September 3

We're back!

We are back from St. Louis. We had a nice, fast & furious trip. The ten hour drive was not bad at all! We had Saturday to do a little sight seeing.... we tried to go to the St. Louis Zoo but it was literally a zoo, we could not find a place to park even when we were more than a mile away! So, we opted for a visit the St. Louis Cathedral Basilica which was absolutely AMAZING with its incredible mosiacs! Afterwards we enjoyed a dish of "concrete" from St. Louis' finest frozen custard establishment "Ted Drewes" and headed home for some R & R.

Sunday was the family reunion. We had a great time visiting with everyone. It was so fun to see the new little babies and see how much our babies from 2 years ago had grown.

As promised, here is a picture of the Fabulous Five.


These are the babies in the same order as the last picture 2 years ago in the previous post. Ironically not much had changed, there were more than 10 adults in the room trying to get the kids to smile and look the same direction. Timothy, front & center, was a ham. Caroline, far right had a fit. Mr Blonde, Charles- far left, endured. Our own Micaela (second from left) smiled but only because she knows better and India, fourth just wanted to know what was going on! Needless to say, it was hilarious. We couldn't believe they acted the exact same way as they did two years ago. We look forward to taking pictures again in 2009, hopefully by age four they will cooperate a little more!