Saturday, March 29

Upcoming Class: Bali Breeze & Flower Fusion


Come make 5 cards and coordinating purse for $15.
(Your choice of sentiments on each card and envelopes included)

This is a great gift for friends & family, teachers and more importantly Mother's Day.

Tuesday, April 8th
Come & go from 6:30 on

Reserve your spot by April 6th, please prepay if you want the additional kit so I can have it waiting for you.

Note: Always bring your own adhesive & basic cutting tools.

Buy additional kit to make more at home for $20
Kit includes:

  • Assortment of Flower Fusion felt flowers (approx 25 pieces 1/5 of box)
  • Assortment of Bali Breeze paper (six 6x6 sheets of each design)
  • Twelve medium envelopes
  • One yard of Striped Pumpkin Ribbon
  • Three yards Wide Old Olive Ribbon
  • Assortment of coordinating card stock 15 sheets of Old Olive, Pumpkin Pie, Rose Red, Taken with Teal & Tempting Turquois
  • Pattern & instructions for purse

I am here...

Didn't mean to be away so many days, time just got away from me with Spring Break & all. I've been busy doing some very serious spring cleaning and organizing in my craft room. What I thought would take 3 days, is now going on almost 3 weeks. More on my room later...

I've been stamping and having classes just haven't had my "ducks in a row" to take pictures and publish here. Below are the four cards from my Fabulous Flowers Card Class this past week. Attendees were allowed to make 1 or 2 of each card. I am offering a second session this next week, if you're interested, please email me.

Carousel Notes


These are my first two 'carousel' note cards and I am so pleased. At the begining, I was really concerned about filling the space since these cards are 6x6 but it all worked out. I used my ancient Creative Memories cutting system to make the chocolate chip and vanilla circles and the brass template to do the piercing and holes. I mounted the whole card on a 12x6 scored in half.


I absolutely love the "My Dear, Kind & Wonderful Friend" sentiment from the All Holidays stamp set. It's stamped in Chocolate Chip Craft Ink and embossed with clear powder. The tulips and butterfly are stamped in classic ink from markers.


Recipe:

Stamp Sets: All Holidays & Garden Whimsey

Markers: Mellow Moss, Pretty in Pink, Creamy Caramel and Close to Cocoa


Fabulous Flowers & Tres Chic

This was the second card in the Fabulous Flowers class. This was inspired by a card made by Jenn Balcer that I had "right clicked" into my favorites file months ago. When I went to her blog and SCS to link it, I could not find it. I changed the embossing and DSP but the general idea was from her. Thanks, Jenn.

Cutting out this flower (3x) is a chore but the end result is pretty.

Recipe:
Stamp Sets: Fabulous Flowers and Tres Chic
Supplies: Pretty in Pink and Certainly Celery card stocks. Spring Fling DSP. Versamark and clear powder on Tres Chic and White Craft Ink and White embossing powder on flower. Ribbon Side from Stylized Silver Hodgepodge Kit.

Heartfelt Thanks

This was the third card in the Fabulous Flowers Card Class. This was one of the first stamp sets I purchased as a demonstrator and this little flower had never been used. Well, it got a work out this past week.
Recipe: Stamp Sets: Floral Background, Heartfelt Thanks, Baroque Motifs, & Lots of Thoughts sentiment
Materials & Supplies: Mellow Moss, Ruby Red and Vanilla card stocks
Groovy Guava, Ruby Red, Choc. Chip, Mellow Moss and Creamy Caramel classic inks
Hodgepodge Hardware in Aged Copper

Dahlia Fold

This was the fourth card in my Fabulous Flowers Card Class.


I kept seeing everyone's Dahlia cards and decided I had to try it. This card was pretty much CASED from diane617 @ SCS. I changed the card base to Pretty in Pink, freehand dry embossed the leaves, and added the Polka Dot background.

Thursday, March 13

My family is growing and growing...

Congratulations to Mandi Brooks (my downline) for her three new recruits in Fannin County. Please help me welcome Karol, Monica and Wendy to our little Bloomin' & Stampin' Family. I knew Fannin County would be a wonderful place to share Stampin' Up!

Wednesday, March 5

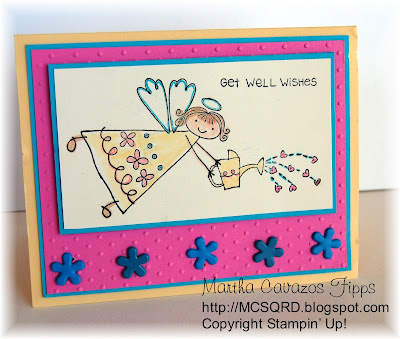
Get Well Wishes


Here's a simple card using "If the Halo Fits". I just love this little fairy! I made this for a friend who just got out of the hospital.


Stamps: "If the Halo Fits" & sentiment from "Year After Year"
Supplies: Black Craft ink & Clear Embossing Powder, Vanilla, Pixie Pink, Tempting Turquois and Barely Banana card stocks
Other: French Dot Cuttlebug Folder, Flower Brads from HL

Tuesday, March 4

Getting ready for St. Patrick's Day

Here are two simple cards I made for St. Patrick's Day.


I've had this Stampendous stamp since Halloween. I had to have it when I saw it back in September then I blinked and did not even get a chance to use it. I came across it when I was doing some organizing and thought I could adapt it for St. Patrick's Day. I think this turned out pretty cute. I used the French Dot Cuttlebug embossing folder for the background.


I made this card at a shoe box swap with some ladies in my sideline. This is the new Wild Wasabi striped ribbon.

One more Baby Shower Item...

I took about 150 pictures at the shower. I wanted to share them with Rhonda (mother to be), Kristi & Laura (other two hostesses). I downloaded all of the pictures to a CD, made copies for each of them and made a holder/sleeve. I had some of the paper from the invitations and a few more little airplanes already stamped and embossed so the project came together quickly. Here's what I came up with.


To make this you can start with a 8.5x11 sheet of card stock. (I used 12x12). Cut it down to 5 1/8 x 11. Score at 2.5 and 7.5 inches. Take the left over strip and cut it down to 7 1/8. Score at 1" on both ends and fold. Folded flaps are what adheres to the middle panel between the horizonal score lines and holds the CD in place. I used a coordinating striped piece instead of the same paper to add a little contrast. I printed the wording on the computer (same font & colors as invite & other stuff). Lastly, I added a second strip of paper to the flap (for decoration), adhered the airplane mounted on the scallop circle and finished it off with a piece of light pink stitched grosgrain ribbon tied in a simple knot.

Snow Day

We woke up to several inches of snow this moring. Can you believe snow in March? We've had snow as late as March 14 back in 89 when I was in college but it's been a long time. Micaela and I bundled up and went outside to play first thing this morning. We built a single snowman but he looked loney, so we built a family. I am pretty proud of our snow family... (I didn't grow up around snow, so I don't have snowman building experience). We used a Bundt pan cake dome and various bowls to make the bodies. We used raisins for eyes (didn't have any coal), a traditional carrot for the noses and apple wedges for the mouths. That's Daddy's Mercedes cap on the Daddy snowman, Micaela's bow and sunglasses on the baby snowman and my hat and scarf from the 80's (I knew I was keeping it for a reason) on the Mommy snowman. The girls needed a little bling so we added some beads from Micaela's dress up trunk. It was a fun morning.


Sunday, March 2

Baby Shower Highlights

Yesterday was Rhonda's Baby Shower. Everything was lovely. Rhonda received two SUV loads of gifts from friends and family, she's all set for the baby's arrival. Here's a little slide show....


Tin Baby Shower Favor

I made two different favors for the guests of the shower because I figured some would want to "save" the airplane. (See post below)
.
These are metal tins by Wilton.


I made another 30 of these and they were a breeze (compared to the airplanes). I used patterned paper and the 1 3/8, 1 1/2 and Scallop Circle Punch by Stampin' Up! I filled the tins with pastel colored M&M's. Everyone seemed to really enjoy them!

Airplane Baby Shower Favors

As mentioned before, the "Daddy to be" is a pilot with a major airline. I used the little airplane from the Toy Box stamp set on the invitations. You can see the invitations on this post.
.
I made these little airplane favors to match.
.


Aren't these stinkin' cute!


Here they all are before take off! The airplanes were a HUGE HIT with everyone. I made 30-something of these little babies and let me tell you, these are very time consuming.

From what I understand, the original idea of using two Lifesavers, one roll of Smarties, a stick of gum and a rubberband to make these little airplanes came from Nichole Heady, it was featured in Paper Crafts magazine. (I am going to try to find out which issue for everyone's reference.)
.
I took that idea and added patterned paper, the propeller and the "sign" on the tail of the plane.
.
Here's a step by step how to:


  • Before I could start the wings, I had to tape the foil wrapper down with some transparent tape because the foil was just too loose once the stick of gum was out of the package.
  • After doing that, I was able to cover the sticks of gum with patterned paper.
  • Before covering the smarties I taped down one end of the wrapper so I could later add the propeller.
  • I covered the rolls of Smarties with trimmed down 2x4 shipping labels that I printed with the polka dot pattern on the computer because I did not have the right green/pattern in my patterned paper stash (hard to believe considering the size of the stash). Using adhesive labels saved me the step of adding adhesive myself.
  • I used some rubberbands/hairbands to hold everything together. First, pierced holes in the cellophane of the Lifesavers, strung the rubberband through and then inserted the wings through the loops and added the Smarties roll between the Lifesavers.
  • I made the propellers using SU Certainly Celery card stock and the small flowers from the retired Spring Flower Punch by Stampin' Up! Used the 1/16 punch to add brad and a glue dot to adhere it to the Smarties. See close up picture:

  • The sign attached to the tail of the plane was made using White and Certainly Celery card stocks and the two Tag Punches by Stampin Up! The pink heart brad in the propeller and the pink heart eyelet in the sign were from my stash, luckily I had 30 of the same. I used the Crop A Dile to set the eyelets, it was super easy and allowed me to work quietly while the family slept since I did this after midnight when everyone was in bed. I printed the tag sentiment on the computer using the same software and colors as invitation. I used some 1/8 wide polka dot ribbon to attach the sign to the tail.

I found the idea originally on Nichole Heady's blog {Capture the Moment}. One of her readers "Barb Schram" made some little airplanes using Paper Trey's Limitless Labels stamp set for a contest. Barb received Honorable Mention but in my eyes the airplanes were the winners. You can see her airplanes by scrolling down to the second to the last picture.

Baby Keepsake Book


I made this small book for everyone to write their wishes for the baby. I made it to match the invitation. This was the first gift opened during the shower and it circulated amongst the guests while the Mother to be opened gifts.


This is a 5x5 blank spiral with chipboard covers. I used the American Crafts designer paper called Pat A Cake and Modge Podge to adhere the paper to the cover. I composed the sentiment on the computer and tied on every pastel ribbon I had to the spiral. See more details about the airplane in the post about the invitation that matches here.