Showing posts with label Cricut. Show all posts

Friday, January 25

Card & Zip Pouch

Hold on tight!  I made a card the other day.  Gasp! I know it's hard to believe.  My Cricut and my paper cutter had two inches of dust on them!

Over the holidays I did some organizing in my paper craft room.  I've decided that if I am not going to do paper crafts I need to get rid of some of this stuff.  So now, I am making an effort to make more cards and use up some supplies.  I have years of SU stuff that I am cleaning out.  I have given tons (maybe not tons but certainly many pounds) of older swap card fronts and scraps from my demonstrator days to one of my former customers who makes cards for Hospice and I have donated some of my surplus tools and things to some teacher friends that need stuff for their classrooms. 

So back to making a card... I made one. Nothing fancy. Here it is. Sorry it's not a "staged" picture, I literally took a quick snapshot with my phone right before putting it in the mail.    I used the Alphalicious cartridge and a variety of SU cardstocks (once upon a time I knew all the colors, right now they escape me). 

 
I made the card to match this zipper pouch I made for my friend Debra for her birthday. She likes turquoise moderny artsy stuff so I thought this fabric with the spirographic design was a nice choice for her.
The seamless lining and zipper was lime green to match the initials embroidered on the front. 
It took more than a week to arrive in Arkansas but she finally got it and loved it!  Your probably wondering if I make anything besides zipper pouches lately, I do!  I've been monogramming up a storm.  I'll be sharing some towels I just did in the next few days.  Thanks for stopping by!


Wednesday, June 20

More Sewing Room Artwork

Here is my second artwork addition.
Hard to tell in the picture, but it is 20 inches wide and 12 inches tall.  I have had this idea in my head for several months and finally got around to making it. 

Here is a brief tutorial on how I did it:
  • I used a 12 x 20 oval embroidery hoop that I purchased at Hobby Lobby.  I spray painted the oval black. Before I spray painted it, I removed the screw so that it would be silver.
  • I cut the sewing machine out using my Cricut Expression 12x24" mat and the Heritage cartridge. I tried several sizes before I settled on this size.  I backed the black fabric with Thermo-web and cut it out using the flip feature.
  • When I placed the black sewing machine on the red dot fabric it needed a little something so I decided to mat the sewing machine cut out using white fabric. The single layered fabric turned out to be too transparent so then I backed it with heavy interfacing. I had to cut that out manually because it was too thick to run through the Cricut.
  • I did not intend to stitch the project at all, but the fabric didn't seem to stick on the edges.  I did a straight stitch on the white layer and then zig zagged on the black layer. 
  • After all of the stitching and adding the heart button, I hooped the fabric, trimmed and glued the fabric to the inside rim of the hoop and held it in place with clothespins to dry.   
Here is how the completed hoop looks on my wall. Thanks for stopping by.

Friday, May 11

Baby Shower at School

Micaela's teacher is expecting and today for the final day of Teacher Appreciation Week, we had a little baby shower. 

Here are the items I made.
A banner.  Did this with felt adhered to fabric using thermoweb.  Added on letters I cut out with Cricut using the Cuttin' Up cartridge and did a simple satin stich around the edge, then stitched each piece to ribbon. 
Here is a close up of the banner.
A pillow for the nursery, theme is lambs.
Here's a closeup of the lamb.  This is the first time I use this design and I think it's adorable, I wish I knew more people with this theme in their nursery.
The last thing was a simple diaper cake.  Instead of ribbon, I used the same fabric as the pillow and banner to wrap around the 'tiers' and embroidered it in the same font as the pillow.

It was so fun to make all these things, I wish I knew more ladies having babies!  Thanks for stopping by.

Linking to Made by You Monday


Saturday, March 17

Cover for Janome 300e!

I finally made a cover for my second embroidery machine, the Janome 300e and I love how it turned out.
Red scissor fabric is from Moda's Half Moon Modern collection, got it at HIQ. The Ruler fabric is from My Mind's Eye, got it at HIQ. The Black & White button fabric used on the M is Brittish from Makower UK, the Henley Studio--got it online. And the black & white striped fabric is from Butterfly Swirl by Jackie Shapiro for Windham Fabrics, got it at QA. I love my two local quilt stores Happiness is Quilting & Quilt Asylum.
I actually had another idea in mind for the M monogram but in the end ended up doing applique using my Cricut Expression and the Designer's Calendar cartridge to cut out the M out of fabric with Therm O Web. My original idea was to make the M with buttons but after sewing on about 30 buttons to the cover I did not like how the buttons weighed down the cover so I ripped-- I mean gently removed them and started over with an appliqued M which I then satin stitched with my DC5100.


Saturday, February 11

Scrapbooking

Gasp! I scrapbooked! I know it's hard to believe that I still play with paper but I do! I just post more about sewing. I am still obsessed with documenting every moment of our daughter's life believe it or not.
Last weekend I went to a scrapbook retreat for 3 days, it was fabulous! The retreat was in Denton which is only about 30 miles from McKinney and one of my long time college friends came along too so it was great to catch up and craft for three straight days.
I was very productive and actually completed nearly 80 pages! I've taken pictures of a few and will be posting in the coming weeks.
Here are the first four!

Thursday, November 3

Halloween Party

We had our second annual Halloween Party on Sunday! We celebrated Micaela's 6 1/2 birthday since we never got around to celebrating with friends during April. Here are a few of my favorite pictures!

The girls made a pumpkins out of old fence posts. When we replaced our gate recently, my husband thought I was crazy when I asked him to save the wood for craft projects. After much convincing, he saved a few pieces. These little pumpkins are made from the posts. Hubby cut the post into blocks, sanded them down, added a light coat of pumpkin orange paint and a little stump made out of a dowl. The girls cut faces out of felt and glued them on, it was cute and very inexpensive! Ahh, our sweets table. This is what happens when you forget to take a picture at the begining of the party before everyone arrives. Some of the letter candy dishes had already been refilled a couple of times by the time I remembered the camera. Nothing too elaborate here. I used fabric for the tablecloth, covered the drink bottles with Halloween scrapbook paper, did store bought cookies, cupcakes and a little 3 inch cake for Micaela. Most of all, I love our new letter candy dishes (I wish I could by several alphabet sets so I could spell out many words for every occassion).

The Pinata-- a total Mexican tradition! I found this cute pumpkin pinata at the party store and thought it would be fun to add an M monogram. I cut out the M with the Storybook cartridge on the Cricut, I think it turned out cute!

All in all it was a great party-- me and hubby were very tired but our little girl was happy and that is all that counts. Thanks for stopping by!

Monday, February 7

Owl Card

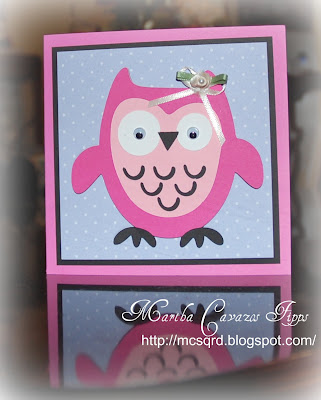
Your eyes are seeing right, a handmade card! Last week during the snow Micaela and I dusted off the Cricut and made a few cards. We made this one for one of her little friends that had surgery recently. The owl is from the Hoot 'n' Holler Lite Cricut cartridge, all the card stock is Stampin' Up! and the card is 5.5 inches square.
Thanks for stopping by!

B & B for Laila

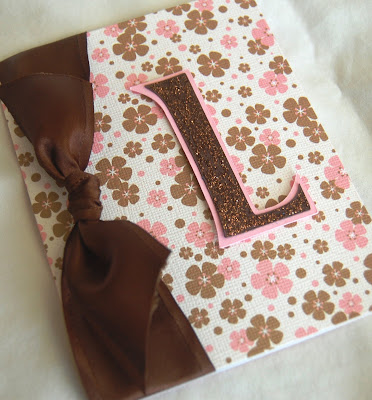
Here's a set I made for a co-workers new baby girl. Her colors are dark pink, brown and green. I added a decorative scallop stitch to the burp cloth using my new Janome sewing machine.

At the last minute, (3am) I whipped up a card to sorta match using prefolded card stock, satin ribbon and an L made with the Alphalicious cartridge on the Cricut.

Thanks for stopping by!

Monday, August 2

Gasp-- A Card!

Yes, a card! I have not given up paper crafting entirely, just gotten a little side tracked with sewing and embroidery. Here's the card Micaela and I made for her friend Isabella. Super simple and quick, just a very glittery FIVE and some retired SU designer paper that just happened to coordinate with the beach towel (above). We made the 5 with the Cricut, used the Alphalicious cartridge.

Saturday, March 20

Stuff for Baby Dylan

Micaela's preschool teacher is having a baby so all of the student's Moms decided to have a surprise baby shower.

This was the bedding she picked out--->>

Thank goodness we asked for a color scheme because I would have never picked this randomly. Very cute, but finding lime green and black fabric combo was tough.

The Monday before the shower last week, our spy informs us the Mom to be has changed her mind-- from black & lime green to brown & green with monkeys. A color scheme I am all to familiar with... see previous posts here. The embroidered stuff was already done but I still had time to change the other stuff I was making.

Here's the card:
I used the new Cricut Mother's Day cartridge, Chocolate Chip & Gable Green card stock from Stampin' Up!

Here's the burp cloth and bib set.


Isn't it cute? I was really pleased with how it turned out. Finding the fabric was tough but I got really lucky because I discovered a store right here in McKinney. A friend who quilts told me about the "Quilt Asylum". They have more than 1500 bolts of fabric, it's absolutely fabulous-- I went there and sure enough, found the perfect fabric!
This is my first applique bib. I've decided letters with holese aren't fun (well at least small letters)-- it's just really hard not to puncture or snag the fabric underneath. Next time, I will use black thread for the satin stitch around the letter too.
Here's the diaper cake. Nothing too fancy, next time I make one I will remember to embroider the ribbon-- The "Bienvenido" word was way too long for me to try it this time around.
Thanks for stopping by.

Friday, December 18

Gift Card Holders

The Teacher Appreciation Committee at one of our daughter's schools specifically suggested gift cards for the teachers for Christmas gifts. All of the gift cards from the children were mounted on a wreath and given to the teacher on the last day of class. I loved the idea because it certainly made the shopping easier! But, I couldn't just hand over the gift card stuck on the card from the store so this is what I came up with...


I love that Winter Woodland font! Here is what the inside looked like...


I used the Sissix Gift Card Holder die to cut out the Garden Green (SU) base. I dressed up the holders with some ribbon and a simple heart shaped rhinestone.


To personalize it, I added a die cut of each teachers monogram using the font from the new Winter Woodland Cricut cartridge. (Real Red & White card stock).


The teachers really seemed to love them!

Friday, December 11

Princess Crown Favor Box


Here's a cute little Princess Crown Favor Box I made using the new Sweet Treats for the Cricut. I cut it at 3 inches and it was a perfect size for filling with a small bag of sweets. I made the name plate by printing white card stock on computer and then punching out with scallopped oval punch from Stampin' Up!


Card Stock: Pink Passion Stampin' Up

Ribbon: Purple Lame

Rhinestones & Stickles.

Monday, September 21

Princess Stuff

So busy these days, finally I had a little time to craft...
.
Here are some goody bags I made for a friend who was hosting a Princess party for her daughter. The 'take out' boxes were purchased, I just made the tags and added the monogram letter for each of the girl's first names. Daughter helped by pressing the buttons on the electronic die cutting machine for the monogram letters & tag layers. She had the most fun cranking the handle on the Sissix for crown. As it turned out, these matched the place where the party was held perfectly! (honestly, that was unplanned).

This is the card we made for the birthday girl. The card base is Pink Passion by SU. The glittered and embossed card stock is from a stack. The FIVE was done with an electronic die cutting machine using the short stack and shadow feature.

This is the inside of the card opened flat-- lots of layers. Used Basic Black and White Glossy for the layers and then more Pink Passion & Basic Black for the design. I meant to take a picture before daughter wrote inside but we got in a hurry and I forgot. Side note, we are working with her on her penmanship, I think she writes pretty good for a four year old.


Thanks for stopping by....

Saturday, August 8

Another ton of cards for Tricia

Grab your sunglasses these cards are bright! Here's a sampling of some of the cards I made for my sister in law. I made 6-10 of each. I have to admit that I totally cheated on this batch, they are all plain cards that I embelished.

These first two are from a DCWV box purchased at Michael's. All I did was add the ribbon and flower with the personalization in the center to the first one and the other the matted circle to the second one. The flower was done with the Flower Layers Sissix die and the 1 1/2 and 1 3/8 circle punches. The satin cocoa ribbon matches well IRL.


The next card two cards were totally pre-made, I just added the matted T with dimensionals. The T's were made using the Alphalicious cartridge on the Cricut. The Thinking of You cards came from Dollar Tree if you can believe it and the next one from Michael's.All these cards were easy peasy, I really debated about posting them here but I figured someone might be inspired to go buy some plain cards at the store and just embellish. Thanks for stopping by....


Sunday, July 19

Happy Birthday Delaney!

This card was long over due! Delaney turned 1 back in April but we had not gotten together. Made this with the Cricut Alphalicious cartridge, it is 5.25 inches square. And, very similar to the cards I've been making for Micaela's friends that are turning 4. The butterfly embellishment is actually made of wood. Looking back at this, I probably should have made the top layer of the 1, cameo coral instead.
Here's the card open.
Thanks for stopping by......

Sunday, June 28

Alphalicious Birthday

Here's a simple card and decorated gift bag I made for one of Micaela's little friends Haley. Micaela and Haley have known each other since they were just a few months old and they attend preschool at the church school together.

First of all I have to say that I did not have my head on straight when I started to make this stuff. I meant for the card & bag to match but did not make sure the gift which was two Fancy Nancy Books fit in the Purple and Pink gift bag first! I discovered this 15 minutes before we were leaving for the party. In a state of panic I decorated another "larger" pink & green gift bag instead. I hope Little Haley can forgive us for our mismatched gift.

This card is 5 1/2 inches square. I made it using the Alphalicious Cricut Cartridge using the crest card feature . The cricut actually cuts out the frame and the letter to size for you. I used some Lovely Lilac cardstock on the inside so the cut out would show through.
I did double layers on the inside. The "4" was also done with the Alphalicious cartridge using the Short Stack & Short Stack Shadow features. The Celebrate & Happy Birthday sentiments were stamped in Lovely Lilac and fairy is a painted wood embellishment I picked up at JoAnn. The clear rhinestones on the front were adhered with glue dots.

The Non-Matching gift bag was decorated with a simple H monogram in Pink Passion & Gable Green-- the H was done with the Short Stack & Short Stack Shadow feature on the Alphalicous cartridge.

Thanks for stopping by, Happy Birthday Haley!