Monday, May 21

Faux Pleated or Strippy Pillow

Yesterday while hubby and Micaela went to the donut shop and out to run some errands, I browsed my sewing pins on Pinterest to find a quick to make while they were gone. (it's nice to start and finish a project without interruptions).

I came across this strippy pillow by Jera at Quilting in the Rain then, I remembered I had watched a video tutorial at the Missouri Quilt Company  featuring V & Company's faux pleated pillow.  I decided to make one.


I don't need another pillow for the bed in my sewing/guest room (already have ten and I have gotten alot of grief about that from some friends) but I could use a pillow or two for a chair I just painted and reuphostered for the corner of the room.

I pulled together all fabrics I have been using to decorate in my sewing area and started cutting strips 2.5 inches wide.  In no time, I had enough to make the pillow-- just 11 strips.  After cutting, I pressed each one in half and tinkered with the order of the fabrics.  Probably the most time consuming part of this project, was deciding the order of the fabrics.  After I figured it out, I used blue painters tape to keep the strips in order. 
I decided to use one of the gingham dishtowels (used on some the bed pillows pictured here) as the foundation fabric for the pillow and then quickly figured out it was the perfect choice because instead of drawing lines every 3/4  inches to guide placing the strips of fabric (like Jera's tutorial)... I could use the rows in the fabric to guide me...  that was a big time saver!
After sewing all the strips down, I used the remaining part of the dishtowel and half of another to create an envelope back... easy peasy (the edges were already finished -- another bonus).

This really came together quickly, I honestly finished before my hubby and daughter made it back home. 

Here's the finished pillow, now the chair doesn't look so loney.... maybe I will make another little pillow so the pillow has a friend...because pillows look better in pairs or is it threes, fours or fives...lol.
Here's a view of the entire corner, you can see the button wreath, and my part of my fabric racks featured last week.
Thanks for stopping by., I hope you have a great week.

Friday, May 18

Rock Star Baby B & B


This is proof that any crazy unusual baby theme is possible if I can find "THE" fabric. This is for the son of major rock & roll fans.  When I got the request, I couldn't even envision what to do then my customer mentioned guitars and I went on major guitar fabric search.  After a local search at four diffierent stores and lots of online browsing, I found this fabric at Wal-Mart--of all places.  (Wal-Mart actually had two other cute guitar fabrics besides this one-- who would have thought?)

The guitar & rock star design is one I had seen online last year at Digistitches, I am so glad I remembered it because I think it coordinates quite nicely with the fabric. 

Made this a little different than usual.  I sandwiched a regular 2-4-2 burp cloth between flannel and the guitar fabric, so the entire back is guitar fabric too.  I top stitched around all the edges in black and then the two center panel seams in white with black bobbin thread for the reverse side to hold the fabrics in place. 

The bib was the usual varsity font I use for boys.  All in all, this is probably the most time consuming set I have ever made but I am very happy with the finished product. 

It's Friday and I am so excited for the weekend even though I have to work a city event tomorrow, hope you have a great day and thanks for stopping by.

Wednesday, May 16

Fabric Organization Wall

I've struggled with a good way to organize my fabric (mainly fat quarters and less than a yard cuts) for a long time.  So far this system is working.  This wall is opposite the wall where my embroidery machines are located. These are CD racks and the fabrics are organized by color and theme.

I am on the verge of ourgrowing this but for now this holds all my "small" pieces of fabric, you can see some cubies have more room than others.   The rest of my fabric (mainly large pieces) are in the cubeical bins below the CD racks and are also organized by theme or type as well


If you follow my blog, you might remember a picture of my sewing area last year where I had the racks on the ground  in the corner by the window.   When I started to run out of space, I had the idea to turn the cubeical bin (that was on the wall where the bed is now) on it's side and put the racks on top.  (Don't know why it took me so long to think of that!).  The CD racks are extremely sturdy and quite heavy so they can hold the weight of the fabric well.  I had a difficult time getting all three, it took me about 6-8 months to "find" them because I refused to pay regular price $40.    I actually found two at the Habitat for Humanity ReStore here in McKinney (9 months apart)  and the last one at a neighbor's yard sale last fall.

Here is a picture of the entire wall .  You can see how all of the posts I've done for the last month or so fit together.  The fabric letter banner, button wreath, lamp shade, covered cans, pillows on the bed, etc.  My space is still a work in progress but I think it's coming together nicely.  I got all my ideas from looking at craft rooms on Pinterest, I hope this inspires someone else. 

Thanks for stopping by and I hope you have a nice day!

Monday, May 14

Teacher Appreciation Gifts

After making the mousepad and tissue holder for my boss last week, I decided to make sets for a few teachers at Micaela's school since it's Teacher Appreciation Week.  I used the same tutorials but this time added embroidery to both items. 

Made this pink set for her main teacher, pink is one of her favorite colors. 

Close Up of the Tissue Holder...


Made this set for the music teacher.  I thought the music note fabric would be fun for her and I embroidered the letters in her favorite color purple. 


Close Up of the Music Tissue holder.... had to embroider this one vertically.


Thanks for stopping by.

Linking to Made by You Monday

Sunday, May 13

Owl Bag for MIL


Made this Owl Bag for my mother in law for Mother's Day. I used the Lola Owl Pattern by Virginia Lindsay of Gingercake Patterns. The directions for easy to follow and the project was quick.

Here is the bag. I used denim I had gotten from my mother's stash for the main fabric. The other fabrics are from my stash. The blue willow looking print I actually purchased with my mother in law in mind because she loves blue. I used double buttons for the eyes and simple white felt for the beak.
Here is the back of the bag (the pocket is straight in real life, the angel of the camera and the stuffing I added for the picture make it look kinda crooked). After I sewed in the pocket, I thought about embroidering so I just added Mimi, the name Micaela calls her to the top.
 
The inside of the bag is lined in the same blue willow looking print and I added a silver magnetic snap by Everything Mary for closure. I had never used snaps like these before, they were super easy to install, there are videos on the website with step by step instructions.
I am looking forward to making more of these bags in other color schemes. If you decide to by the pattern please tell Virgina, Martha sent you. I hope you all had a great Mother's Day, I know I did. Thanks for stopping by.

Friday, May 11

Baby Shower at School

Micaela's teacher is expecting and today for the final day of Teacher Appreciation Week, we had a little baby shower. 

Here are the items I made.
A banner.  Did this with felt adhered to fabric using thermoweb.  Added on letters I cut out with Cricut using the Cuttin' Up cartridge and did a simple satin stich around the edge, then stitched each piece to ribbon. 
Here is a close up of the banner.
A pillow for the nursery, theme is lambs.
Here's a closeup of the lamb.  This is the first time I use this design and I think it's adorable, I wish I knew more people with this theme in their nursery.
The last thing was a simple diaper cake.  Instead of ribbon, I used the same fabric as the pillow and banner to wrap around the 'tiers' and embroidered it in the same font as the pillow.

It was so fun to make all these things, I wish I knew more ladies having babies!  Thanks for stopping by.

Linking to Made by You Monday


American Idol

So proud of Hollie.  Looking forward to her big welcome home back to McKinney.  She has inspired so many young people in our city, proud to welcome her home very soon.

Thursday, May 10

Another Throw Pillow

Made another throw pillow for the guestroom/sewing room bed.  After this I think I am kinda done...lol.   I've had this in my head for a while and finally had some time to make it. 

This is made from a block in the quilt panel of the Brittish SEW fabric by the Henley Studio and Makower.  I got it at the Quilt Asylum back in the fall last year.  It coordinates with the fabric I used for Micaela's sewing machine cover.  I wish I could find more of this fabric and store it forever because I think it's so cute. 
The red polka dot fabric on the pillow is the same one I used on my sewing machine cover.  I used the same format as the M pillow next to it (I now realize I should not have them next to each other).  You can see the tape measure pillow on the left is made with some of the same fabric from the sewing machine cover too.  The black & white ginham pillows are actually made from dish towels I found in the dollar bin ($2.50 set) at JoAnn, I just sewed two towels together and I was done.  I've got to run, hope you have a great Thursday.

Tuesday, May 8

Mousepad & Tissue Holder

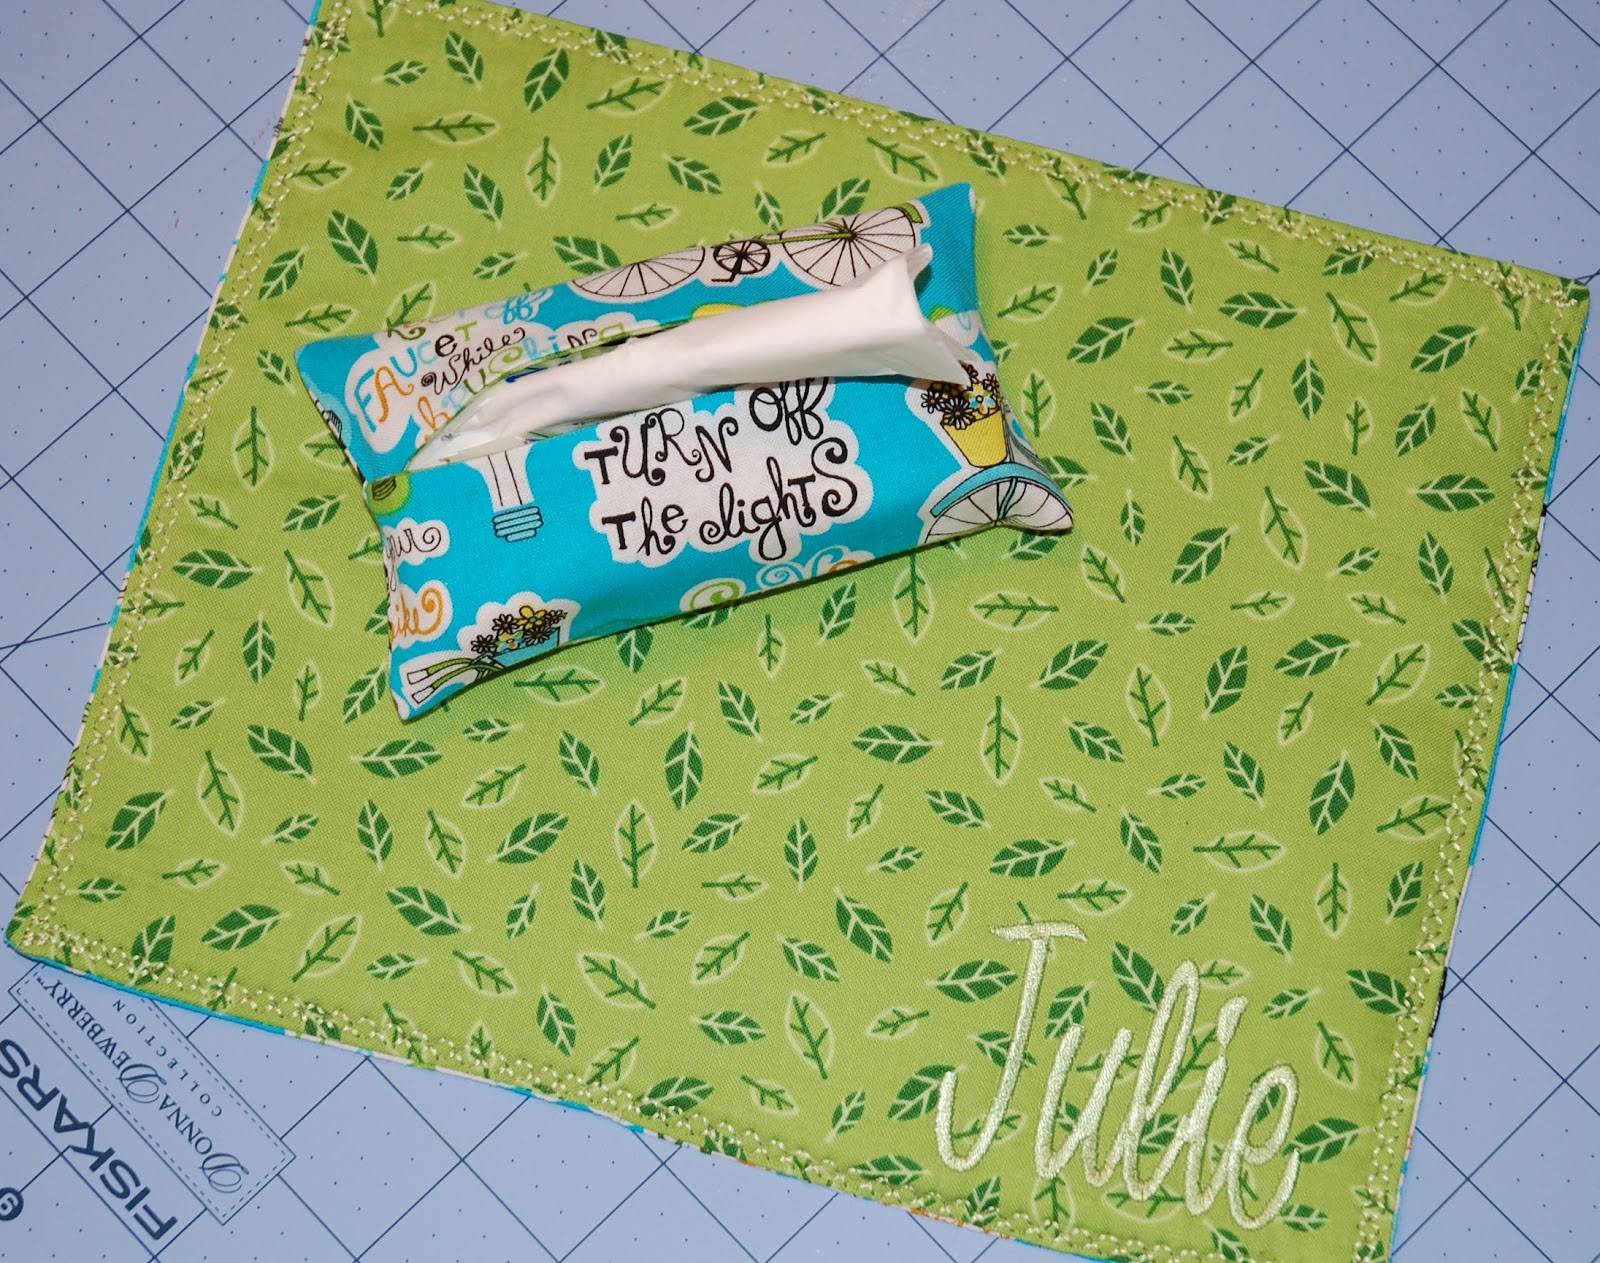
Made this mousepad and pocket tissue holder for my boss Julie's 50th birthday. The mousepad is reversible and has the same fabric as tissue holder on the backside.


I followed this tutorial at More Misadventures to make the mousepad but added the embroidered name and a layer fusible fleece to give the pad some body.  The leaf fabric is designed by Amy Schimler for Robert Kaufman Fabrics and its from the Animal Party Too collection.  I love it. 

Here is the backside of the mouse pad.  This fabric is called Save Energy and is by Michael Miller, I went bananas when I just stumbled upon it while searching for something else online.  This fabric totally represents what we do so I thought it was beyond perfect. 


Here is a closeup of the tissue holder.  I followed this tutorial at Skip to my Lou for it and it was super easy.  You can't tell in this picture but the inside of the holder is lined in a coordinating plaid fabric.  I wish I had thought of top stitching the edge of the tissue holder to match the mousepad but since I made the tissue holder first, it's too late now.

Hope you are having a great Tuesday, thanks for stopping by!

Monday, May 7

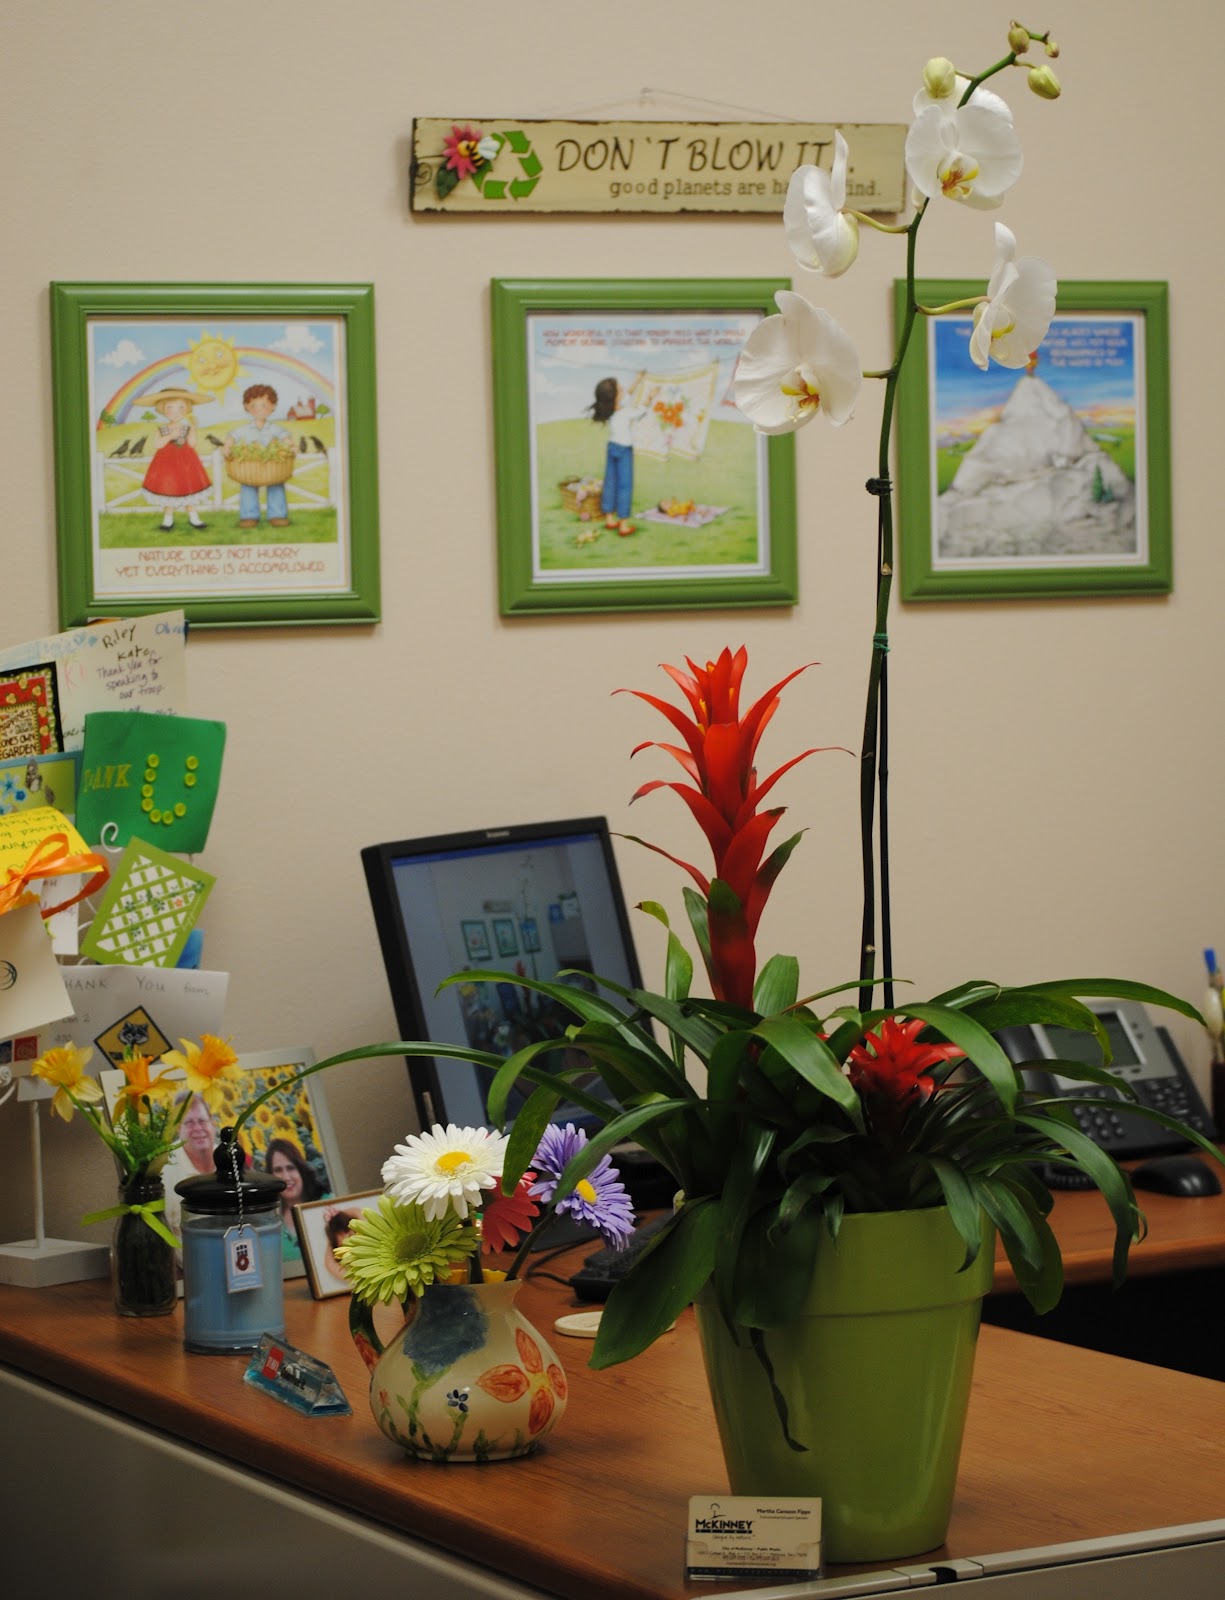
Received this gorgeous orchid & plant after speaking to the MISD PTA Council today during lunch. It looks so nice sitting on my desk! This totally makes my day! Always a pleasure speaking to a great group of residents that want to know about our programs!

BTW--  That is Mary Engelbreit artwork in the background.  I know it's not the usual decor for a government office--  All of the quotes & art portrayed are environment related.  Hope you are having a great Monday!

Micaela's Pin Cushion

Micaela loves to sew.  Her latest project is pin cushions, also known as bean bags to her.  She shops for fabric in my stash and comes up with her own combinations.  Lately she is making different pin cushions for different seasons/holidays-- (umm, I wonder where she get's such crazy ideas?). 

Here she is with her latest creation, a pin cushion made with Hello Kitty fabric.  The sewing part is less than 12 inches but she is so proud.  She carefully turns it right side out, makes sure the corners are pointy and fills them with walnut litter, then has me close them.  
She's discovered these are perfect pillows for Barbie too.  Here's Barbie resting in her birthday ball gown on one of the beds from my townhouse (circa 1978).  I think Barbie is going to get a stiff neck from laying on such a hard pillow but Micaela thinks Barbie will be okay.  Thanks for stopping by!


Saturday, May 5

Button Wreath

Good Morning! 
I kept admiring all the cool button wreaths on Pinterest and decided I needed to make one. 

I started with a straw wreath that I had covered in black satin ribbon for Halloween and just started adding buttons and pins.  Let's just say I highly recommend a thimble.  When I started the project, I thought I would be done pretty quickly.  After a couple of days, I made a special trip to the store for a thimble because I could not find one at home.  This took me a while.  It's hard to tell in this picture but this wreath is 18 inches in diameter and is covered with buttons on the back too.  I literally put this together while watching the last season of the Bachelor.  (I try to do something productive while watching mindless tv shows). 

I used more than 1800 pins and almost 900 buttons.  My index finger hurt from pushing all the buttons into the straw but I love how it turned out.  I had a bunch of buttons already then had my Mom send me some of hers.  When I got her package, Mom sent some from my great aunt and one of her friends, so there is a nice mix of old and new including some orphan buttons from my own childhood outfits that my Mom made me (I guess those could be considered kinda semi vintage).

This wreath proudly hangs in my sewing area.  Slowly but surely my room is coming together. 
Hope you are having a great weekend thanks for stopping by!

Thursday, May 3

Lamp in Sewing Room

The room where I sew is technically our 4th bedroom which is supposed to be a guest room.  Since most of our out of town family has moved here, it is rare for us to have guests.  I've sorta taken over the room with my sewing stuff but I am still keeping a bed and normal guest room things in the room.

In keeping with the red and black color scheme of the sewing stuff, I decided the lampshade on the bedside table needed to be redone to coordinate with the rest of the room.  This was an easy peasy project that I probably should have done a long time ago.  I took a shortcut and purchased one of the self adhesive shades, added the Sew Now Sew Wow- Alexander Henry fabric and a pom pom trim to the bottom and I was done.  I have used the Sew Now fabric all over the room, can you tell I love it?  


The fabric hooped on the wall is more of the 'sewing machine' black & white fabric from the spray cans I covered last month.  I am doing a whole group of fabric hoops on the wall but I am not quite done. 

The little table the lamp sits on belonged to my grandmother so it has probably been in the family for about 100 years (my Dad is 82).  Growing up, it was orange peach color, then I brought it with me to college when I got my first appartment; with me it's been several different colors.... now black.  The yellow crocheted doily on the table was made by my maternal grandmother, it's one of the only things I have that belonged to her.  Everytime I look at the table and doily, I am reminded of my hometown and family.  Hope you are having a great day.  Thanks for stopping by!


Wednesday, May 2

Fabric Banner

I made these  "Sew Much Fabric" ~fabric banner letters while I was off for a few days last week.  I made them to place above the racks where I store all of my fabric. They are an In the Hoop design from Pickle Pie Designs. The design calls for stringing the letters together with ribbon but instead I ommitted the ribbon and just hid a flat tac in the back layer of the letter to hang them on the wall.  These are super quick and easy to make.  I think it takes longer to hoop the fabric and cut around the letters than it does to sew them.   I'll show the 'fabric racks' where I store all my small cuts of in the next few days. 

Thanks for stopping by.

Saturday, April 28

First Bloomers

I hope you are having a great Saturday.  I am enjoying my time off.  Today Micaela and I are headed to Shreveport for a girl trip, we are so excited. 

I could not go to Shreveport empty handed.  I've been wanting to embroider baby bloomers forever and finally had a 'candidate'.  These are for my dear friend's grand-daughter.  I still can't believe, I have a friend who is in my age range (forty-something) who has a grandchild.  I remember when the daughter, now the new mom was a toddler herself...

Here are the bloomers...

I embroidered the eyelet pair in a monogram font that I use all the time.  I thought the hot pink and black would be kinda fun.  I love this font, I've used it for aprons, and pillows and lots of other stuff.  
The second pair is denim and I used a firecracker font.  I thought these would be cute for Memorial Day, Flag Day and of course Fourth of July.  These were so fun, I wish Micaela was still a baby so I could make her some.  Thanks for stopping by!

Friday, April 27

Daffodil Bag

If you read my blog, you know I am into Daffodils.  Last month I made a bag to carry all my stuff to the Texas Daffodil Show at the Dallas Arboretum.  This is the bag.


I started by purchasing the daffodil design from Embroidery Boutique more than a year ago.  (that's how long I have been thinking about making this bag).  Then I purchased about 12 different fabrics in yellow and green.  I wanted a patchwork look, my inspiration was a bag made from a jelly roll (2.5 inch strips of fabric).  I pieced all the fabrics together and made up the bag as I went along.   I top stitched the strips with a decorative stitch and alternated yellow and green thread. I appliqued a free hand circle I cut from a lid (honest) with the daffodil applique on it and then top stitched it to the bag.    I lined the inside with one of the yellow fabrics, added a ruffle at the top, a velcro closure, and long strap so I could carry it criss cross.  Ta Da.   
Thanks for stopping by! 

Thursday, April 26

Butterflies & Bees in our Backyard

Went outside to pull weeds and water this morning (I took a day off from work). Discovered the Augusta Duelberg plant was covered in bees and butterflies. I quickly ran in the house to get the camera, these are a few of my snapshots. I could have taken pictures for hours, the bees and butterflies just kept posing for me...


I am enjoying my day away from the office.  Thanks for stopping by!

Wednesday, April 25

Quilted Laptop Sleeve

A couple weeks ago we purchased a new laptop.  I decided it needed a 'homemade' sleeve using some fun fabric I found in the WalMart fabric department~~ of all places.  I followed a great tutorail by Sew Mama Sew that I found on Pinterest. 

I followed pretty much the whole thing but instead of using fusible fleece adhered to a contrasting fabric for lining, I used real fleece in a solid color.  I also did some "quilting" to sew the fleece in place.  (This is the same fleece I used to make the soccer blanket last year).   I also added two strips of velcro for fastening to allow a fitted closure if I had a few extra things in the sleeve.

The tutorial was very good and easy to follow.  I think it turned out pretty cute and I look forward to making a few more. 

By the way, if you haven't discovered Pinterest, its's quite addictive.  I have more than 2000 pins, everything from sewing ideas, to tablescapes, to paperscraps, feel free to follow me here.  Thanks for stopping by!

Monday, April 23

Micaela's Sewing Space

This is Micaela's little corner of 'our' sewing room.  We got her the mini cube shelf (Mini Cubeicals by Closetmaid from Target) for her birthday because she wanted a shelf like mine for her stuff.  She even helped assemble it yesterday. We had the little table but now her space is more like mine.  She loves it!  Notice the fabric in the top left cubby is her assortment of weenie dog fabric, we'll be making a cover for her sewing machine and some cute stuff for her room with them very soon. 

Thanks for stopping by!