

Sunday, November 30
Fun Times with Mimi
Micaela woke up the other morning talking about how Mimi (MIL) was going to take her to the carousel at the mall when she came to visit over Thanksgiving. I don't know where she got that idea, maybe one of the other kids at school. Well of course Mimi had to make that dream a reality when she arrived. Here they are! Micaela is blessed!

Wednesday, November 26
Turkey Taragon Spread
I've been doing demonstrations with attachments at Williams Sonoma this month. We're promoting using the Stand Mixer and Food Grinder attachment to make a Turkey Taragon spread.
This would be a great recipe to make with left over turkey.
Turkey Taragon Spread
2 cups cooked turkey or chicken cut into strips
1/4 small onion1 rib celery, cut into pieces
1/2 cup mayonnaise
2 Tablespoons milk
1 Tablespoon Dijon Mustard
1/2 teaspoon dried tarragon leaves
1/8 teaspoon black pepper
Use fine grind plate on Food Grinder attachment, turn Mixer to speed 4. Grind turkey, onion and celery into mixer bowl placed beneath the FGA remove grinder. Add all remaining ingredients to bowl. Mix everything for one minute. Serve spread with Triscuits.
This would be a great recipe to make with left over turkey.
Turkey Taragon Spread
2 cups cooked turkey or chicken cut into strips
1/4 small onion1 rib celery, cut into pieces
1/2 cup mayonnaise
2 Tablespoons milk
1 Tablespoon Dijon Mustard
1/2 teaspoon dried tarragon leaves
1/8 teaspoon black pepper
Use fine grind plate on Food Grinder attachment, turn Mixer to speed 4. Grind turkey, onion and celery into mixer bowl placed beneath the FGA remove grinder. Add all remaining ingredients to bowl. Mix everything for one minute. Serve spread with Triscuits.
Sunday, November 16
Pumpkin Harvest Loaf Pan
Enabler Alert.
If you are a baker, you need this!
 Williams Sonoma has the cutest loaf pan for Pumpkin Bread, check this out! It even fits in the toaster oven! It was $29.99 but now it's $14.99.

If you are a baker, you need this!
Williams Sonoma has the cutest loaf pan for Pumpkin Bread, check this out! It even fits in the toaster oven! It was $29.99 but now it's $14.99.
Saturday, November 15
Dickens of a Christmas...

If you are local and want something to do Thanksgiving weekend, Dickens of a Christmas will be going on at the McKinney Square. For more information, check out DowntownMcKinney.com
Wednesday, November 12
Reusable Bags...

In the Dallas metroplex there is a Wal-Mart at every corner it seems. We actually do a fair amount of our grocery shopping there, since there is one fairly close to our neighborhood. I noticed the other day that Wal-Mart is now selling reusable bags. These bags are only $1 and a great size for groceries. I did a little bit of research and read they are committed to reducing their plastic bag waste by a third by 2013, Yippee! Read more about it here.
Monday, November 10
Thanksgiving Card
 Fall is definitely here. I finally planted my pansies last week. Here's my first Thanksgiving card of the year. Yes, I am behind this year. The card base is Always Artichoke stamped with the Stiched background in Artichoke. The fancy rectangle is the Stampin' Up Top Note die; the first layer is Pumpkin Pie and the second is Juntos DSP from the Celebrando Creatividad Spanish Catalog. The Pumpkins are from the Autumn Harvest stamp set; I stamped them in Chocolate Chip craft and embossed with clear powder. The Happy Thanksgiving sentiment is one I had cut out of a $ stamp bin at either Michael's or JoAnn.
Thanks for stopping by....
Getting Ready for Thanksgiving...
We're getting ready for Thanksgiving at our house! We're having the entire Fipps gang over for dinner here... 10 people total. DH will handle the bird and I will help with side dishes, make desserts and get the house ready. I am excited!
I've been trying to decide on some new side dishes and dessert. Tonight I decided to try out the Truffles recipe featured in the lastest issue of Kraft Foods magazine. The truffles turned out okay, but they are pretty labor intensive. I want to try a second batch with a white chocolate outer layer because I didn't like dark chocolate inside very much.
Here's the recipe I tried.... It's super easy to put together, the hard part is making the balls.
Simply Sensational Truffles
-

Ingredients:
2-1/2 pkg. (20 squares) BAKER'S Semi-Sweet Chocolate, divided
1 pkg. (8 oz.) PHILADELPHIA Cream Cheese, softened
decorations: chopped PLANTERS COCKTAIL Peanuts, multi-colored sprinkles
I've been trying to decide on some new side dishes and dessert. Tonight I decided to try out the Truffles recipe featured in the lastest issue of Kraft Foods magazine. The truffles turned out okay, but they are pretty labor intensive. I want to try a second batch with a white chocolate outer layer because I didn't like dark chocolate inside very much.
Here's the recipe I tried.... It's super easy to put together, the hard part is making the balls.
Simply Sensational Truffles
-
Ingredients:
2-1/2 pkg. (20 squares) BAKER'S Semi-Sweet Chocolate, divided
1 pkg. (8 oz.) PHILADELPHIA Cream Cheese, softened
decorations: chopped PLANTERS COCKTAIL Peanuts, multi-colored sprinkles
Instructions:
- MELT 8 chocolate squares. Beat cream cheese with mixer until creamy. Blend in melted chocolate. Refrigerate until firm.
- SHAPE into 36 balls. Place on waxed paper-covered baking sheet.
- MELT remaining chocolate. Use fork to dip truffles; return to baking sheet. Decorate, then refrigerate 1 hour.
Recycling PSA
Back in September during our Environmental Kick Off with the school district, we met some kids from the C.U.T.E. Club at McKinney High School. CUTE stands for Clean UpThe Environment.
During a recent meeting that I attended, they brainstormed about getting the message of recycling out to fellow students. I suggested PSA since many of the students are involved in journalism. Well, they took the idea and just produced their first video.
I am so proud of these kids. Here is a link to the video which is featured on MHS1
http://www.schooltube.com/video/14198/CUTE-Club-PSA
During a recent meeting that I attended, they brainstormed about getting the message of recycling out to fellow students. I suggested PSA since many of the students are involved in journalism. Well, they took the idea and just produced their first video.
I am so proud of these kids. Here is a link to the video which is featured on MHS1
http://www.schooltube.com/video/14198/CUTE-Club-PSA
Our Family is Growing

Meet "Maxi" the newest member of our family. Maxi is a Jack Russell Terrier and oh so cute! She is Micaela's new best friend. Now DH is outnumbered 3 to 1, poor guy!
Wednesday, November 5
Turning a New Leaf
Last month one of my girl friends turned a new leaf.... she turned 40! Her husband hosted a little party for her and I volunteered to make the invitations. She hinted about wanting something simple with fall colors and leaves so this is what I came up with. In the end I used the second design.
.
Both were made using Chocolate Chip and Very Vanilla card stocks. I used the two different Paper Shaper punches for the leaves on the first one and a Cuttlebug die for the More Mustard leaf on the second one.


.
Both were made using Chocolate Chip and Very Vanilla card stocks. I used the two different Paper Shaper punches for the leaves on the first one and a Cuttlebug die for the More Mustard leaf on the second one.
Monday, November 3
Voting Green
Voting Green….Car pool to the polls tomorrow.
If 10,000 people share a 5-mile ride with three friends to the polls (round-trip), we'll avert the same amount of CO2 produced by almost four Americans in a year.
Organize a carpool with coworkers or friends, so nobody, forgets to vote, and to reduce traffic.
If 10,000 people share a 5-mile ride with three friends to the polls (round-trip), we'll avert the same amount of CO2 produced by almost four Americans in a year.
Organize a carpool with coworkers or friends, so nobody, forgets to vote, and to reduce traffic.
Saturday, November 1
Pasta Demo @ Dillards
Today I had a KitchenAid demonstration at Dillard's in Firewheel Mall in Garland. Here's my tiny little display in the middle of their Housewares Department.

I demoed the KitchenAid pasta roller attachment. If you have never made pasta, it is truly very easy especially when you use the KitchenAid. Normally I make the pasta from scratch but KA recently partnered up with Ecco La Pasta. Now it's even easier because as long as you follow the instructions precisely, (only add water) you really can't mess up. I highly recommend thier mixes. You can find Ecco La Pasta products at Williams Sonoma, Whole Foods and many grocery stores.
I demoed the KitchenAid pasta roller attachment. If you have never made pasta, it is truly very easy especially when you use the KitchenAid. Normally I make the pasta from scratch but KA recently partnered up with Ecco La Pasta. Now it's even easier because as long as you follow the instructions precisely, (only add water) you really can't mess up. I highly recommend thier mixes. You can find Ecco La Pasta products at Williams Sonoma, Whole Foods and many grocery stores.
Thursday, October 30
Wedding Card

Here's a simple wedding card I made the other day. I took several pictures of this card but I couldn't get the silver to photograph well. The striped paper is from the DCWV Christmas Glitter Stack, I thought it was perfect for a simple wedding card because the the subtle sparkles (which you really can't see). The cake image is from the Fun & Fast Notes. I stamped in VersaMark and embossed with silver embossing powder and used markers to color. I used the Circle and Scallopped Circle Nestabilities for matting the image, the scallopped layer is Silver Metalic paper (sorry it looks grey). A simple knot in white sheer ribbon to finished it off.
Tuesday, October 28
We had the party....
This week Micaela and I hosted a little Halloween Party for a couple of her friends and their Mommies. In keeping with my effort to be green I wanted to share what I did our Halloween Party to have zero waste.
Here's Micaela and one of her little friends enjoying a morning snack served in my BOO letter dishes-- Gold Fish and Trix cereal looked cute.
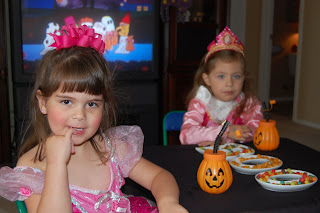 Instead of filling the trashcan with paper plates, plastic forks, cups, tablecloth and decorations after the party was over, here's what we did.
Here's Micaela and one of her little friends enjoying a morning snack served in my BOO letter dishes-- Gold Fish and Trix cereal looked cute.
Instead of filling the trashcan with paper plates, plastic forks, cups, tablecloth and decorations after the party was over, here's what we did. - I set a little table for Micaela & friends. It's one of those inexpensive kid size card tables with folding chairs. Instead of using a paper or plastic table cloth, I made one out of two one yard remants of seasonal fabric. I made the tablecoth reversible one side black, the other with a jack-o-lantern print.
- Instead of buying Halloween paper napkins, we used cloth. (Don't freak). I have always liked to use cloth napkins for parties, I usually just buy fabric by the yard, cut out squares 17x17 and sew a simple hem. I thought my black ones would be too morbid for kids and didn't have orange... thank goodness I had some yellow gingham ones from my Pink, Blue and Yellow stash for Baby Showers.
- We used real forks--- no plastic
- All the decorations outside and inside were from my stash--most I've had for 6 to 10 years.
- I used re-usable plastic pumpkin shaped plates for the girls... Got them at a discount store on clearance 2 for $1 when Micaela was a baby-- glad to finally have used them for the first time this year.
- Used reusable cups for their drinks, made one pitcher of Kool-Aid and refilled the cups as needed (eliminated juice boxes/pouches). The pumpkin cups were one of the favors.
All in all, zero waste and the girls had a great time.
Wednesday, October 22
Witch Shoes

Here's a simple card I made using the Witch Shoes stamp from Stampendous. Some little fingers got ahold of it while it was drying, please excuse the smudges. The dotted background was done with the Polkadot background stamp from SU. The sheer Orange ribbon and Happy Halloween sentiment is a $1 stamp are from Michael's.
Have a Green Halloween!
As Halloween approaches, here are several ideas for trick-or-treaters and treat-givers to add more green to the orange and black holiday.
- When planning a Halloween monster bash, use reusable utensils, plates, napkins and tablecloths instead of disposable ones.
- When you are shopping for Halloween goodies, buy candy that uses the least amount of packaging. Kids may clamor for chocolate and candy corn, but after Halloween's over, wrappers may be as common as tummy aches.
- Look for the recycled content in items you buy and carry reusable bags to put your groceries in," Krupp said.
- Walk or ride a bike for Halloween parties or trick-or-treating. If you have to drive, carpool to help reduce traffic and air pollution.
- Try to re-use Halloween decorations in the same way that Christmas ornaments are used from year-to-year, instead of throwing them away each November first.
Most of all, use this holiday to think about your everyday habits and actions to reduce waste 365 days a year. The scariest aspect of Halloween may not be the ghosts in the attic, but the waste on the floor. Individual actions can make a huge difference for our future.
Information from Environmental Defense Fund 10-21-08
Monday, October 20
Simple Monogram Cards

My friend's SIL wanted some very simple Save the Date cards for her wedding next year. Her colors are Chocolate & Sage. Here are the three cards I came up with using the Lovely Letters alphabet set from Stampin' Up!
I used Chocolate Chip craft ink, Chocolate Chip and Sage Shadow Card Stock and Chocolate Ribbon. We plan to use chocolate envelopes and use a gold pen for addressing.
This one has 1" wide Sheer Chocolate Ribbon. The medallion is from the Wanted stamp set.

I used 5/8 inch wide Chocolate Chip Ribbon and just circle punches on this one. I used the 1-1/4, 1-3/8 and 1-1/2 circle punches for the circles.

I used 1/4 inch wide Chocolate Chip grosgrain ribbon and the first two circle punches from above on this one.

Sunday, October 19
Witch Party Favors

I made these the other night using the Witch punch from my 'pal' Martha Stewart. The punch is so intricate, I love the detail in the witch. I used More Mustard to make the top layer look like a moon and Basic Black for the scalloped circle. These containers are from Wilton and you can find them in the wedding favor section at any craft store. I used 1/4 inch ribbon from Stampin' Up! to dress up the container but it really looks fine without it. Thanks for stopping by.
Witch Hat Treats
In keeping with the witch theme, here's another EASY recipe to try. This one is from Betty Crocker.

32 Hershey®'s Kisses® milk chocolates, unwrapped
1 package (11 1/2 ounces) fudge-striped shortbread cookies (32)
1 tube (4.25 ounces) orange or red decorating icing
Attach 1 chocolate candy to chocolate bottom of each cookie, using decorating icing.
Pipe decorating icing around base of milk chocolate candy. TaDa, how much more simple can it get?
1 package (11 1/2 ounces) fudge-striped shortbread cookies (32)
1 tube (4.25 ounces) orange or red decorating icing
Attach 1 chocolate candy to chocolate bottom of each cookie, using decorating icing.
Pipe decorating icing around base of milk chocolate candy. TaDa, how much more simple can it get?
You can access the recipe at the Betty Crocker website by clicking here.
Green Tip

Did you know that two weeks of daily newspapers equals one full grown tree?
Please think about that the next time you're putting your newspaper in the trash.
Saturday, October 18
Owls & Matching Kitchen Linens

My MIL has collected owls for a long time and last month sometime I was at Target and saw these cute fall themed kitchen towels and pot holders. I immediately thought of her and picked them up to send in a care package from Micaela.
 Then a few weeks ago I was checking out Dawn's blog and saw this cute owl card made out of punches! Ta-Da! I knew what I had to do.
 Here's the card I came up with to send with the kitchen linens. I tried to match the colors and patterns, notice the Aida Cloth background on the Old Olive circle (just like the towel) and I added an additional circle punch on the owl's belly to match the pot holder.
 I generated the sentiment on the computer and did layers on the inside. This was a really fun card to make. I am not sure who came up with the owl originaly but I applaud them for having a brain that puts random shapes together to make totally cute things.
  Dawn has a video tutorial on how to make the owl, you can access it by clicking HERE.
I generated the sentiment on the computer and did layers on the inside. This was a really fun card to make. I am not sure who came up with the owl originaly but I applaud them for having a brain that puts random shapes together to make totally cute things. Dawn has a video tutorial on how to make the owl, you can access it by clicking HERE. This Friday was my in-law's 49th Wedding Anniversary, I hope they enjoy receiving the card & tiny gift. Thanks for stopping by.
Pumpkin Seed Brittle
 I visited Williams Sonoma last week and they were sampling Spiced Pumpkin Seed Brittle. OMG, it's delicious! I've tried making brittle before and it didn't quite turn out, buying it is definitely the way to go.
If you have a Williams Sonoma in your area, definitely buy some-- you will love it. Or you can always order online and have it shipped to you!
Friday, October 17
More Boos
Here are some more cards made with those cute foam ghosts....
 This is the card Micaela is mailing to here little friends. She wanted pink, not orange-- I think it works. We used the Top Note Die for the Pink Passion Layer and the Bubbles Cuttlebug embossing folder to emboss the Black layer. Micaela loves to crank the Cuttlebug!
These are little itty bitty Boo cards like the ones from yesterday. I made these for my SIL to give to her co-workers.

Here you can see the little matching envelopes. These are coin envelopes from Staples. I got like 500 for around $15. The envelopes are that manilla color which is pretty darn close to More Mustard. The Oct 31 stamp in the corner is a stamp form the $1 bin at either JoAnn or Michael's and the Boo is from the Pictograms stamp set from SU. 

I stamped the inside with the Happy Boo to You from the retired Booglie Eyes stamp set.
Ghost Appetizers
Micaela is going to have a tiny little Halloween party/playdate with some of her friends. I say tiny because it's only going to be her and two other little girls. They will be here during lunch time so I've been looking for some fun foods to serve.
In keeping with Micaela's new found facination with ghosts, (she has no idea what a ghost even is, she just likes how they smile) I think this recipe from Pillsbury is going to be perfect. I love two ingredient recipes. I plant to assemble them the night before and just bake them off right before I need to serve them.
 INGREDIENTS
1 can (8 oz) Pillsbury® refrigerated crescent dinner rolls
1 cup shredded mozzarella cheese or Colby-Monterey Jack cheese blend (4 oz)
Assorted sliced olives and chiles, as desired
DIRECTIONS
Heat oven to 375°F. Spray large cookie sheet with cooking spray, or cover with cooking parchment paper.
On cutting board, unroll dough; separate into 8 triangles. From center of longest side to opposite point, cut each triangle in half, making 16 triangles. Shape each as needed to look like ghost shape. Arrange triangles on cookie sheet, folding narrow point under about 1/ 2 inch, to form head of ghost.
Bake about 7 minutes or until slightly puffed and just beginning to brown. Sprinkle each ghost with 1 tablespoon cheese; top with sliced olives to form mouth and eyes. Bake 2 to 3 minutes longer or until cheese is melted.
You can access all the 'ghostly' details on their website by clicking here.
In keeping with Micaela's new found facination with ghosts, (she has no idea what a ghost even is, she just likes how they smile) I think this recipe from Pillsbury is going to be perfect. I love two ingredient recipes. I plant to assemble them the night before and just bake them off right before I need to serve them.
INGREDIENTS1 can (8 oz) Pillsbury® refrigerated crescent dinner rolls
1 cup shredded mozzarella cheese or Colby-Monterey Jack cheese blend (4 oz)
Assorted sliced olives and chiles, as desired
DIRECTIONS
Heat oven to 375°F. Spray large cookie sheet with cooking spray, or cover with cooking parchment paper.
On cutting board, unroll dough; separate into 8 triangles. From center of longest side to opposite point, cut each triangle in half, making 16 triangles. Shape each as needed to look like ghost shape. Arrange triangles on cookie sheet, folding narrow point under about 1/ 2 inch, to form head of ghost.
Bake about 7 minutes or until slightly puffed and just beginning to brown. Sprinkle each ghost with 1 tablespoon cheese; top with sliced olives to form mouth and eyes. Bake 2 to 3 minutes longer or until cheese is melted.
You can access all the 'ghostly' details on their website by clicking here.
Subscribe to:
Posts (Atom)